|
TIPS: THIS KIT WAS DESIGNED SPECIFICALLY for the stock
OEM CV40 carburetor, this kit will NOT function properly when used on the Screamin Eagle CV44
Carburetor. Jetting may be the same as stock, but because of a variety of different high performance
products, it is best to make sure that the jetting is properly set (a spit or pop thru the carburetor or a
ping or knock in the engine under a heavy load is a lean condition, if the carburetor is overly rich, the
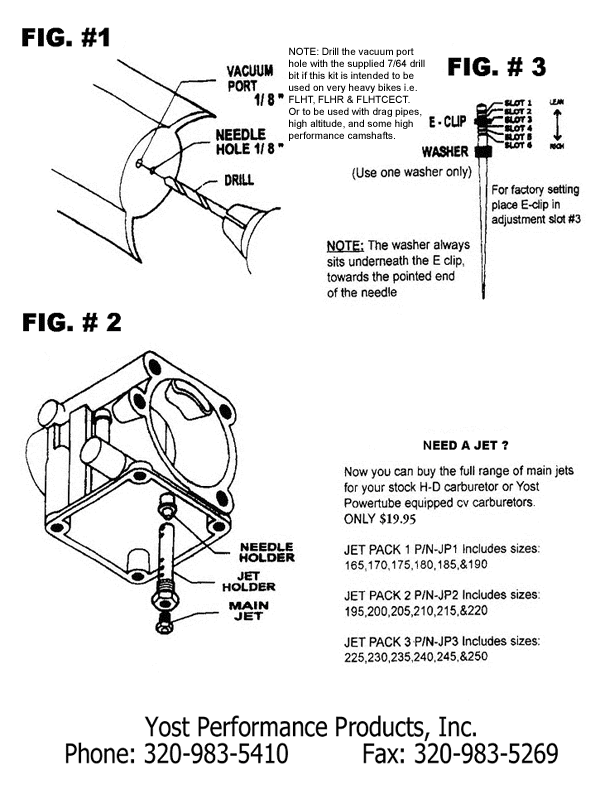
bike will simply be sluggish). Drilling the vacuum port hole in the slide with the supplied1/8" drill bit
is a good choice for general-purpose racing (NOTE: drill the vacuum port hole with the supplied 7/64
drill bit if this kit is intended to be used on very heavy bikes i.e. FLHT, FLHR &FLHTC ECT. Or to be
used with drag pipes, high altitude, and some high performance camshafts) The vacuum port can be
enlarged further, but use good judgment when selecting the port diameter, if the port diameter is too
large the slide will open too fast and create a flat spot.
Maximum performance can ONLY be obtained by using a high flow air cleaner (open style) and exhaust
system or mufflers. (Basically, anything other then stock units will work well.)
NOTICE: ON ALL BIKES, THE NEEDLE HOLE MUST BE DRILLED WITH THE
SUPPLIED 1/8` DRILL BIT (see figure 1)
INSTALLATION INSTRUCTIONS FOR CV40 MASTER KIT.
1. Remove the carburetor from the motorcycle (if you have questions, consult a factory service manual.)
2. Remove the air cleaner assembly.
3. Remove and drain the float bowl.
4. Remove the stock main jet and jet holder.
5. Remove the stock slow speed jet or low speed jet and replace with a #45 slow speed jet or a #46 slow
speed jet on a twin cam model. (JETS NOT INCLUDED). NOTE: some exhaust systems may require richer jets.
6. Install the new power tube and install a supplied 175-185 main jet on evolutions, 185-195 on twin cams, on all
other bikes as a rule of thumb, simply to be on the safe side, use a main jet 1 to 2 sizes richer than your original
main jet, (the smaller number jets are leaner, the larger the number, the richer the jet). DO NOT OVERTIGHTEN;
the power tube will be damaged. This kit also comes with 165, 175, 185, & 195 main jets if you need a leaner or
richer mixture. Reuse your stock main jet if it is larger than the jets in this kit. Our jets are completely
interchangeable with the stock H-D Jets. (See figure 2)
YOST PERFORMANCE PRODUCTS, INC NOW HAS A LARGE VARIETY OF JETS AVAILABLE IN 3 DIFFERENT
JET PACKS RANGING IN SIZE FROM 165 TO 250, 6pk for only $19.95
7. Install the float bowl.
8. Remove the cable holder and black plastic cover on the top of the carb, (on late model
carbs, you will find a brass reducer washer underneath the cable holder).
9. Remove the slide, spring & spring retainer (the white plastic spring retainer has six fingers on it.)
10. Drill out the needle hole at the bottom of the slide with the supplied 1/8" drill bit. Drill out the vacuum port hole
with either the 7/64" or the 1/8" drill, (see the tip section).
11. Install the slide into the carb.
12. Install the new (pat) red flow control, or the new blue flow control needle, use only one washer and place it
underneath the E clip that is attached to the needle, (the blue needle is best suited for stock, mildly modified bikes,
economy, high altitude, high port velocity heads, 883 sportsters, or any other application where the red needle is
simply too rich) call our tech. Line if you need assistance. (See figure 3)
13. Install the white plastic spring retainer (make sure that the vacuum port hole that you just drilled out is between
the fingers of the retainer.)
14. Install the spring.
15. Install the black plastic cover and cable holder (BE VERY CAREFUL, YOU DO NOT WANT TO DAMAGE THE
RUBBER DIAPHRAGM, if the rubber diaphragm has swelled and will not fit properly, let it sit over night and it will
contract back to its normal shape.)
16. Install the carb into the motorcycle (coat the rubber flange seal in the intake manifold with a light coat of dish soap or WD40)
IF YOU HAVE ANY QUESTIONS, FEEL FREE TO CALL OUR TECH LINE,
WE'RE OPEN MONDAY THRU FRIDAY, 9AM TO 5PM (CENTRAL STANDARD TIME).
YOST PERFORMANCE PRODUCTS, INC
PO BOX 186 380 8th St NE
Milaca, MN
Phone (320) 983-5410
FAX (320) 983-5269

|

